


Tutorial 2 - Getting Started
This tutorial will show you how to set up your workbook and enter your first loan into the software.
|
|
|
Click here to view this tutorial as a slide show
or, scroll down the page to read the tutorial. |
|
1. Easily Work With Your Loans
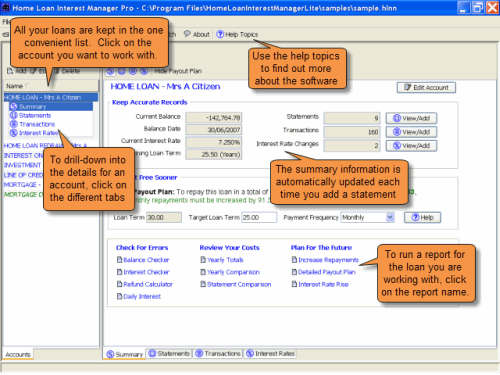
The summary view provides you with all the key information you need to manage each loan, and it includes your payout plan, easy access to the detailed views, and the ability to run the reports at the click of a button.
|
|
|
2. Find Help in the Software
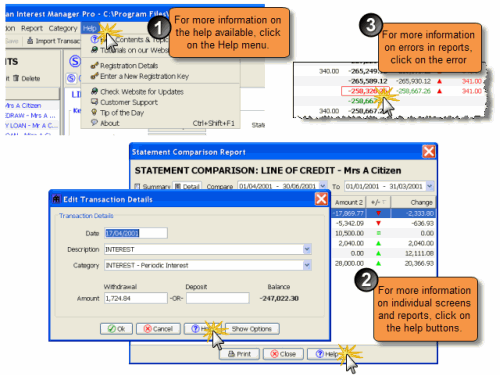
As you work with the software you can find help (1) from the main menu, (2) using the buttons on each screen and report, and (3) by clicking on the errors displayed in reports.
|
|
|
3. Create a New Workbook and Add an Account
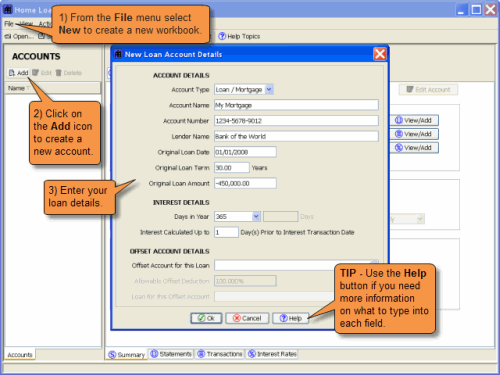
The first step to working with your loans is to create a new workbook and add an account for your loan. Tip - The Help button will show you what to type into each field on the screen.
|
|
|
4. Enter a Statement
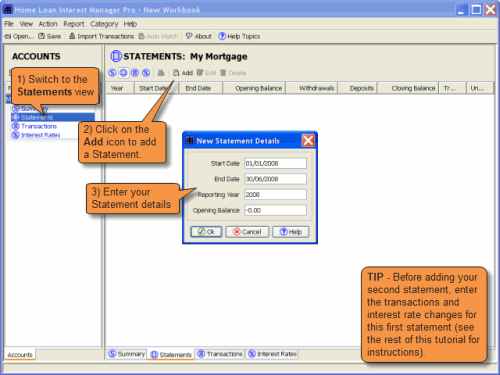
Navigate to the Statement view and create a statement. If your Internet Banking site only provides you with the latest transactions, then start with a statement that covers this period (you can always add older statements at a later date).
|
|
|
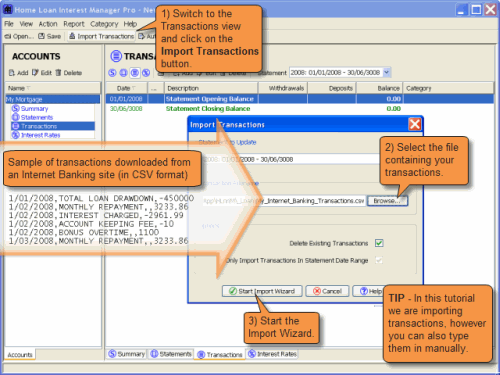
5. Import Transactions into the Statement
Navigate to the Transaction view and add the transactions for the statement you have just created. You can type them in, or you can import them from a file after you have downloaded them from your Internet Banking site.
|
|
|
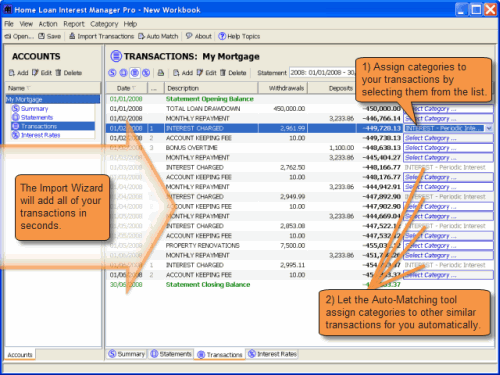
6. Automatically Assign Categories to Transactions
After the import wizard has created all of your transactions, start assigning categories from the drop-down list. The Auto-Matching tool will do most of the work for you by assigning the same category to similar transactions.
|
|
|
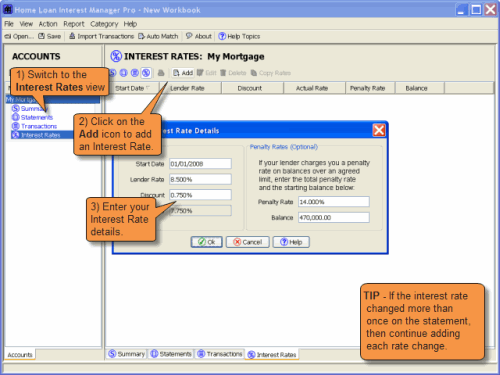
7. Enter the Interest Rate Changes
Navigate to the Interest Rate view, and add an interest rate for each rate change on the statement. Tip - If the rate hasn't changed for the period then skip this step. If it's a fixed rate loan then enter the fixed rate.
|
|
|
8. What Next?
Once you have added your first statement to the software, we recommend you view the Check For Errors tutorial to see how the software will help you find errors in your statements.
You may also find the following user manual help topics useful (available both here on the web and in the software):
Entering Your Loan Details
If you need more detailed instructions on setting up your workbook, adding a loan, and entering your first statement, we recommend you take a quick look at the entering your loan details help topic.
Importing Transactions
For detailed instructions on loading your transactions from your Internet banking site, refer to the importing transactions help topic.
The Sample Workbook
Each account in the workbook is described in the sample workbook help topic, making it easy for you to find an example account similar to your own loan. |
|