

ACCOUNT DETAILS
| |
|
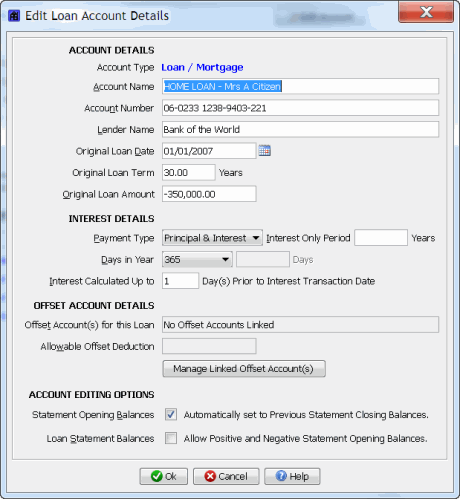
Account Type
|
For new accounts, if you are adding a loan, mortgage, line of credit, or any other form of debt, set the account type to Loan / Mortgage. If you are setting up an account that will offset the interest charges on a loan, set the account type to Offset Account.
Note: Once you have created (added) an account, you cannot change the account type. |
|
Account Name
|
Identifies the account and is used in the title of all the screens and reports.
|
|
Account Number
|
The account number allocated to you by your lender.
|
|
Lender Name
|
The name of the lender or bank providing the account.
|
|
Original Loan Date (or Date Created)
|
For a loan or mortgage this is the contract date (usually the date you borrowed the money). For other account types this is the date the account was set up with the lender.
Tip - This date lets the software know how old your account is, and therefore it must always be set to the original contract date of the loan. If you decide you only want to enter the latest statements for the loan (for example, if you have a loan that is ten years old and you only want to enter statements for the last year), this date should still be set to the original date from ten years ago (and not the date you start entering statements). |
|
Original Loan Term
|
For a loan or mortgage this is the loan term in years (Eg 30). If the account has no loan term then leave this field empty (Eg line of credit account, offset account).
|
|
Original Loan Amount
|
For a loan or mortgage this is the amount you have agreed to borrow. For a line of credit this amount is the total credit limit. For an offset account this amount would be zero.
Tip - In Home Loan Manager Pro an account balance should be set to a negative number when you owe money. Therefore all your loan and mortgage accounts will normally have negative balances. |
|
Payment Type
|
Select "Principal & Interest" or "Interest Only" depending on your loan type. If you select "Principal & Interest" you can also enter an interest only period for the start of the loan.
|
|
Days In Year
|
Number of days in the year that Home Loan Manager Pro will use in the interest calculations. The most common setting is 365, however please check your loan contract for details on interest calculations.
Tip - Refer to the Interest Calculations help topic for more information. |
|
Interest Calculated Up to Day(s) Prior to Interest Transaction Date |
This field impacts the date range used in the interest checker report.
Normally a lender will calculate interest up to the day prior to them charging you. For example, if you have an interest transaction on your statement with a date of the 25th of May, then it is most likely for the period ending the 24th of May. Home Loan Manager Pro automatically estimates the date range used by your lender in their interest calculations, by using the date you enter for the interest transaction, and the value you enter into this field. For example, if your interest transaction is dated the 25th of May (and this field is set to 1), then the interest checker report will calculate the interest up to the 24th of May. If you set this field to 2 then it will calculate interest up to the 23rd of May, and so on. If your lender does not follow a set pattern, or they process a transaction late one month, then you can edit the individual interest transactions and manually specify the required end date in the field "Date Interest Calculated Up To". Tip - Refer to the Interest Calculations help topic for more information on interest period date ranges. |
OFFSET ACCOUNT DETAILS
| |
Loan / Mortgage Account Fields
| |
|
Offset Account for this Loan |
If you are currently viewing a loan account, then this field will display the offset account you have linked to it (if any). If there are multiple offset accounts linked then it will provide a summary of the number of account linked (e.g. "3 offset account linked").
|
|
Allowable Offset Deduction |
This determines how much of the offset account can be used as a deduction against the primary loan (default is 100%). If there is only one offset account linked then it will show the discount percent. If you have multiple offset accounts linked to the loan then this field will be blank.
|
|
Manage Linked Offset Account(s) |
Clicking on this button will pop-up the Linked Offset Account Maintenance table that lets you view, add, edit and delete the offset accounts linked to this loan (including the allowable deductible percent for each offset account)
Note - If you select an offset account that is already linked to another loan, it will break the link from the old loan and link it to the current loan account you are viewing. |
Interest Offset Account Fields
| |
|
Loan for this Offset Account |
If you are currently viewing an offset account then this field will display the primary loan account it is linked to. The drop down box will display all valid loan accounts in the workbook that this offset account can be linked to.
Note - If you select a loan account that is already linked to another offset account, it will break the link from the old offset account, and link it to the current offset account you are viewing. |
|
Allowable Offset Deduction |
This determines how much of the offset account can be used as a deduction against the primary loan (default is 100%)
|
ACCOUNT EDITING OPTIONS
| |
|
Statement Opening Balances
|
Automatically set to Previous Closing Balances.
We recommend this setting is left switched on for all accounts, as it will allow the software to automatically maintain your opening balances for you (based on the closing balance from the prior statement). This option makes it quicker to enter new statements (as the balance is set for you), however it is also useful if you have to go back to an old statement and change a transaction amount (as all statement balances will automatically be updated for you). Note - This option will only work when the end date of one statement is the day before the start date of the next statement. For example, previous statement ends on 15 May 2013, and the next statement starts on 16 May 2013 then the balance will automatically be set. |
|
Loan Statement Balances
|
Allow Positive and Negative Statement Opening Balances.
By default loan balances should be entered into the software as negative numbers, and therefore we recommend this setting is left switched off to prevent you accidentally entering a positive balance by mistake. If you do enter a positive balance and this option is switched on the software will automatically convert it to a negative number for you. For example, with this option switched on when you type in 350,000 the software will automatically convert it to -350,000. Note - If your loan ever does go positive (and the bank owes you money), then you will need to switch off this option so that you can enter positive balances into the software. |

|
Start Date
|
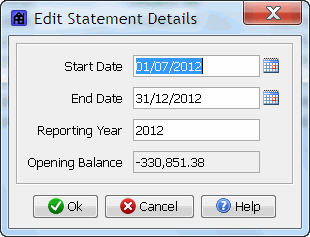
The start date of the statement. This field would normally be set to the start date as it appears on your statement. If you do not receive statements, then set this field to the start of the transaction date range you wish to process.
Tip - When you first start using Home Loan Manager Pro you don't have to start with the oldest statement first. For example, if you have a loan that is ten years old and you want to get started with the statements for the last year, you can create your first statement starting a year ago and add older statements at a later date. Tip - You should keep the date ranges of your statements in a continuous time line. That is, the start date of one statement should be the end date of the previous statement plus one day. When you create a new statement, Home Loan Manager Pro automatically calculates a default start date for you (using the end date of the previous statement). |
|
End Date
|
The end date of the statement. This field would normally be set to the end date as it appears on your statement. If you do not receive statements, then set this field to the end date of the transaction date range you wish to process.
|
|
Reporting Year
|
The reporting year is used in the Summary reports to group information into yearly totals. Normally you would set it to the same year as the start and end date. If the statement start date and end date are in different years then you can select either year as the value for this field. There are no constraints on the reporting year, except that it must be a number.
|
|
Opening Balance
|
The balance of the account as at start date. This field would normally be set to the opening balance on your statement. If you do not receive statements then this value must match the balance of the account as at the date you have nominated in the start date field.
Note: In Home Loan Manager Pro an account balance should be set to a negative number when you owe money. Therefore all your loan and mortgage accounts will normally have negative balances. You can enter a negative or positive number and Home Loan Manager Pro will automatically set it to negative if required. Note: When the account setting "Automatically set to Previous Closing Balances" is switched on, the software will automatically maintain the opening balances for you, and you will not be able to edit it in this screen. If you need to manually edit the opening balance on a statement, then you will need to swith off this account setting. Refer to the Account Detail Screen above for more information. |

TRANSACTION DETAILS
| |
|
Date
|
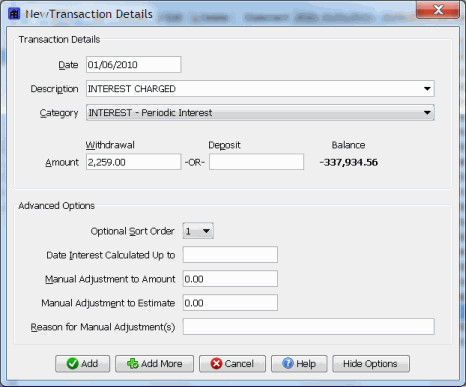
The date the transaction amount impacted the account balance. This field would normally be set to the transaction date as it appears on your statement.
|
|
Description
|
A meaningful description for the transaction.
To save you having to type in all your transaction descriptions, Home Loan Manager Pro will auto-fill the field as you type, based on previous transaction descriptions you have entered for the account. |
|
Category
|
The category the transaction is to be grouped under in the Summary reports.
Note: Set the category to INTEREST if the transaction is an interest charge that is to be audited. Refer to the entering your loan details help topic for more information on assigning categories. Note: You can change the category descriptions by selecting Maintain Categories from the main Category menu (you will need to close the transaction details screen first). |
|
Amount
|
The amount of the transaction. This field would normally be set to the transaction amount as it appears on your statement.
|
|
Balance
|
The balance amount for this transaction.
Note: If the balance does not match the amount on your statement, check you have entered all of the transactions before this one in the same order as they appear on your statement, and check the statement opening balance you have entered into the software is correct. |
| |
|
Optional Sort Order |
This field is used by Home Loan Manager Pro to help sort two or more transactions that have the same transaction date. If you are manually entering transactions in the same order as they appear on your statement, then this field will automatically be maintained for you and you can ignore it. If you import your transactions then you may need to change this value.
For full details refer to the transaction sort order help topic. |
|
Date Interest Calculated Up to |
This field is optional and it is only applicable to transactions that have been allocated a category of type INTEREST.
If this field is left blank (recommended) then the interest calculator will use the default value on the account and calculate the end date for the interest period by using the transaction date, and subtracting the default number of days nominated in "Interest Calculated Up to Day(s) Prior to Interest Transaction Date". If you enter a date into this field then the interest calculator will use it as the end date for the interest period when calculating interest, instead of the default value set on the account. Tip - For most interest transactions leave this field blank and let the interest calculator use the default value set on the account. You should only set a value in this field if your lender doesn't follow a set pattern with your interest charges and you need to manually tell the interest calculator the end date of an interest transaction. Refer to the interest details section on the account screen for more information on how to use this field. |
|
Manual Adjustment to Amount |
This field is only applicable to transactions that have been allocated a category of type INTEREST.
The Interest Checker Report and the Refund Calculator Report use the "Manual Adjustment to Amount" and "Manual Adjustment to Estimate" values to adjust the report values before displaying them. These two fields are normally used as a way of removing small rounding errors from being displayed on the reports, without having to edit the transaction amount (which would have a flow on effect to the balance). Refer to the rounding errors help topic for more details. |
|
Manual Adjustment to Estimate |
This field is only applicable to transactions that have been allocated a category of type INTEREST.
Please see explanation for "Manual Adjustment to Amount" above. |
|
Reason for Manual Adjustment(s) |
This field is only applicable to transactions that have been allocated a category of type INTEREST.
Enter the reason you are setting values for "Manual Adjustment to Amount" and/or "Manual Adjustment to Estimate". |

INTEREST RATES
| |
|
Start Date
|
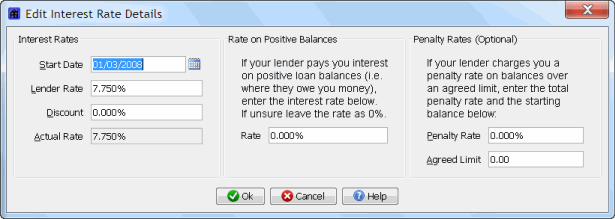
The date this interest rate should be applied from (inclusive).
|
|
Lender Rate
|
The yearly interest rate charged by your lender.
If you do not receive a discount (see Discount Rate below) then this field should be the yearly interest rate that your lender uses to calculate your interest. Normally the interest rate will be displayed on your statement. Note: If you are calculating you own values from an index, then this figure should include the margin applied by your lender. |
|
Discount Rate
|
This field is optional. If you do not receive a discount then leave the field blank (or 0.000%).
If you have negotiated a discount from the standard lender rate, then enter it here. For example, if you belong to an organization that receives a 0.500% discount, then enter 0.500% in this field. Note: Before entering a discount rate, check that the interest rate your lender is providing on your statements hasn't already been adjusted for the discount. If your lender is already adjusting the rate, then leave this field blank, otherwise Home Loan Manager Pro will include your discount twice. |
|
Actual Rate
|
The actual rate is calculated from the two fields above, and is set to the "Lender Rate" less the "Discount Rate". Home Loan Manager Pro uses the "Actual Rate" value in all internal interest calculations.
If you don't enter a discount rate, then this field will always match the lender rate. Note: The actual rate figure must match the yearly rate being used by your lender to calculate your interest, therefore if you have set a discount rate, please make sure this rate is correct. |
|
Rate
|
If your loan goes positive (that is, your lender owes you money) then you can enter a rate that applies on the positive balance amount.
Note: Lenders don't normally pay interest on positive loan balances, so the normal setting for this field is zero percent. |
| |
|
Penalty Rate
|
The penalty rate charged by your lender if you borrow over an agreed limit.
This field is optional and is mainly used for line of credit loans. The rate should be the total penalty rate charged. For example, if your lender normally charges you 7.5% with a 2% penalty on amounts over 100000, then this rate should be set to 9.5% (= 7.5% + 2%), and the balance field should be set to 100,000 (see Balance below). Leave the field blank (or 0.000%) if penalty rates don't apply. |
|
Agreed Limit
|
The starting balance for the penalty rate.
This field is optional and is used with the penalty rate. If this field is set to a value greater than zero it will be used in the interest calculations to determine when the penalty rate should be applied. Leave the field blank (or 0.00) if penalty rates don't apply. Note: The penalty rate is only applied to the proportion of the balance over the amount specified in this field. |